摘要
考虑到服务器没有配置界面,而需要在服务器上配置一些虚拟机,可以使用基于 KickStart 无人值守的方式,基于命令行来安装配置和使用虚拟机。安装完成的虚拟机直接可以使用SSH在局域网内连接。
配置主机环境
libvirt-client.x86_64 0:3.9.0-14.el7_5.8
Libvirt 的客户端,主要功能是在宿主机关机时通知虚拟机正常关机,防止强制关机导致数据丢失。
qemu-kvm.x86_64 10:1.5.3-156.el7_5.5
KVM在用户控件运行的程序
virt-manager.noarch 0:1.4.3-3.el7
基于 libvirt 的可视化虚拟机管理工具
libvirt.x86_64 0:3.9.0-14.el7_5.8
用于管理虚拟机的APi
virt-viewer.x86_64 0:5.0-10.el7
显示虚拟机控制台的console
virt-top.x86_64 0:1.0.8-24.el7
查看虚拟机的资源使用情况,类似于top命令
qemu-img-1.5.3-156.el7_5.5.x86_64
virt-install-1.4.3-3.el7.noarch
虚拟机安装工具
使用 HTTP 服务提供安装镜像
1、安装 HTTP 服务
通过运行下面命令安装 HTTP 服务:1
yum install httpd
2、拷贝 ISO 镜像
从网络下载或是从其他服务器将 CentOS 7 的二进制 DVD ISO 镜像拷贝到 HTTP 服务所在的主机上。这里拷贝到如下位置:1
/home/packages/CentOS-7-x86_64-DVD-1804.iso
3、挂载镜像
首先在 /mnt 目录下创建一个目录 /mnt/ctos7-install,这个目录名字随意。然后使用以下命令挂载镜像:1
mount -o loop,ro -t iso9660 /home/packages/CentOS-7-x86_64-DVD-1804.iso /mnt/ctos7-install
4、拷贝安装包
使用如下命令将安装镜像中的文件拷贝到 HTTP 服务的目录中:1
cp -r /mnt/ctos7-install/ /var/www/html/
拷贝完成之后,可以在 /var/www/html/ctos7-install 目录下看到以下内容:1
2
3
4[root@weilu_125 ctos7-install]# ls
CentOS_BuildTag GPL LiveOS RPM-GPG-KEY-CentOS-7
EFI images Packages RPM-GPG-KEY-CentOS-Testing-7
EULA isolinux repodata TRANS.TBL
这些内容就是镜像中的文件。
5、启动 HTTP 服务1
systemctl start httpd.service
6、开放端口
HTTP 服务默认使用的 80 端口一般防火墙是没有开放的,可以使用命令检查:1
firewall-cmd --query-port=80/tcp
如果返回的是 no 则表示没有开启,使用如下命令开启:1
2
3
4
5# 开启端口
firewall-cmd --add-port=80/tcp --permanent
# 重新载入配置
firewall-cmd --reload
7、测试
在浏览器中输入这台主机的 IP 地址加上路径:1
http://192.168.0.125/ctos7-install/
可以看到如下内容,说明HTTP服务配置成功。
编写 Kickstart 文件
在 HTTP 服务目录下创建一个文件 /var/www/html/kickstart/ks.cfg,将如下内容填充到文件中:1
2
3
4
5
6
7
8
9
10
11
12
13
14
15
16
17
18
19
20
21
22
23
24
25
26
27
28
29
30
31
32
33
34
35
36
37
38
39
40
41
42
43
44
45
46
47
48
49
50
51
52
53
54
55
56
57
58
59
60
61
62
63
64
65
66
67
68
69
70
71
72
73
74
75
76
77
78
79
80
81
82
83
84
85
86###############################################################
#
# Environment setup
#
###############################################################
# url --url="http://192.168.0.125/kickstart/ks.cfg"
text
cdrom
auth --enableshadow --passalgo=sha512
keyboard --vckeymap=us --xlayouts='us'
lang en_US.UTF-8
eula --agreed
reboot
###############################################################
#
# network configuration
#
###############################################################
network --bootproto=static --ip=192.168.0.151 --gateway=192.168.0.1 --netmask=255.255.255.0 --noipv6 --device=eth0 --nameserver=192.168.0.1,8.8.8.8 --activate
network --hostname=weilu_151
timezone Asia/Shanghai --isUtc
###############################################################
#
# partitioning
#
###############################################################
ignoredisk --only-use=vda
bootloader --location=mbr --boot-drive=vda
zerombr
clearpart --none --initlabel
autopart --type=lvm
# part swap --asprimary --fstype="swap" --size=1024
# part /boot --fstype xfs --size=200
# part pv.01 --size=1 --grow
# volgroup rootvg01 pv.01
# logvol / --fstype xfs --name=lv01 --vgname=rootvg01 --size=1 --grow
###########################################################################################
#
# User Accounts
# Generate encrypted password: python -c 'import crypt; print(crypt.crypt("My Password"))'
# Or openssl passwd -1 password
#
###########################################################################################
rootpw king
# user --groups=wheel --name=josepy --password=password --gecos="Mutai Josphat"
###############################################################
#
# SELinux and Firewalld
#
###############################################################
#selinux --enforcing
#selinux --permissive
selinux --disabled
firewall --enabled --http --ssh --ftp --port=https:tcp --port=ipp:tcp
# firewall --disabled
###############################################################
#
# Software Packages
#
###############################################################
%packages --nobase --ignoremissing
@core
@base
vim
bash-completion
%end
根据实际情况修改文件中的以下内容:
键盘和语言设置1
2keyboard --vckeymap=us --xlayouts='us'
lang en_US.UTF-8
网络配置
这里配置的是使用网桥连接,固定IP:1
network --bootproto=static --ip=192.168.0.151 --gateway=192.168.0.1 --netmask=255.255.255.0 --noipv6 --device=eth0 --nameserver=192.168.0.1,8.8.8.8 --activate
主机名1
network --hostname=weilu_151
时区1
timezone Asia/Shanghai --isUtc
这里可以使用命令 timedatectl list-timezones 查看所有时区的列表。
root密码1
rootpw king
在 rootpw 指令后面跟的就是root账号的密码。
创建虚拟机
使用如下命令创建虚拟机,之后整个过程会自动进行,不需要交互操作:1
2
3
4
5
6
7
8
9
10
11
12virt-install \
--name centos7-3 \
--memory 2048 \
--vcpus 2 \
--disk path=/home/kvm3/centos7.0.qcow2,size=50 \
--location http://192.168.0.125/ctos7-install/ \
--os-variant centos7.0 \
--network bridge:br0 \
--graphics=none \
--console pty,target_type=serial \
-x 'console=ttyS0,115200n8 serial' \
-x "ks=http://192.168.0.125/kickstart/ks.cfg"
执行该命令后,会自动安装配置虚拟机: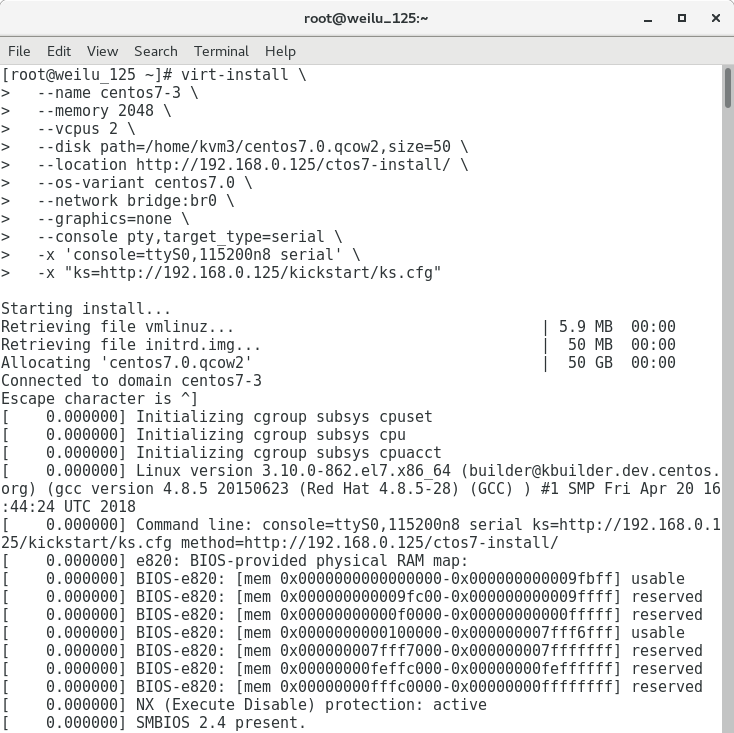

安装完成之后,命令行会自动连接登录到虚拟机中,输入用户名密码即可登录虚拟机。
管理虚拟机
以命令行启动虚拟机
以命令行启动虚拟机,并将该命令行连接到虚拟机中的命令行:1
virsh start centos7-3 --console
如果期间出现以下错误:Active console session exists for this domain
完整信息:1
2
3
4
5[root@weilu_125 Pictures]# virsh start centos7-3 --console
Domain centos7-3 started
Connected to domain centos7-3
Escape character is ^]
error: operation failed: Active console session exists for this domain
只需要重启虚拟机守护进程即可:1
systemctl restart libvirtd.service
连接虚拟机
对于已经启动的虚拟机,可以使用以下命令以命令行的方式连接虚拟机:1
virsh console centos7-3
问题
下面罗列一些在这个过程中可能碰到的问题。
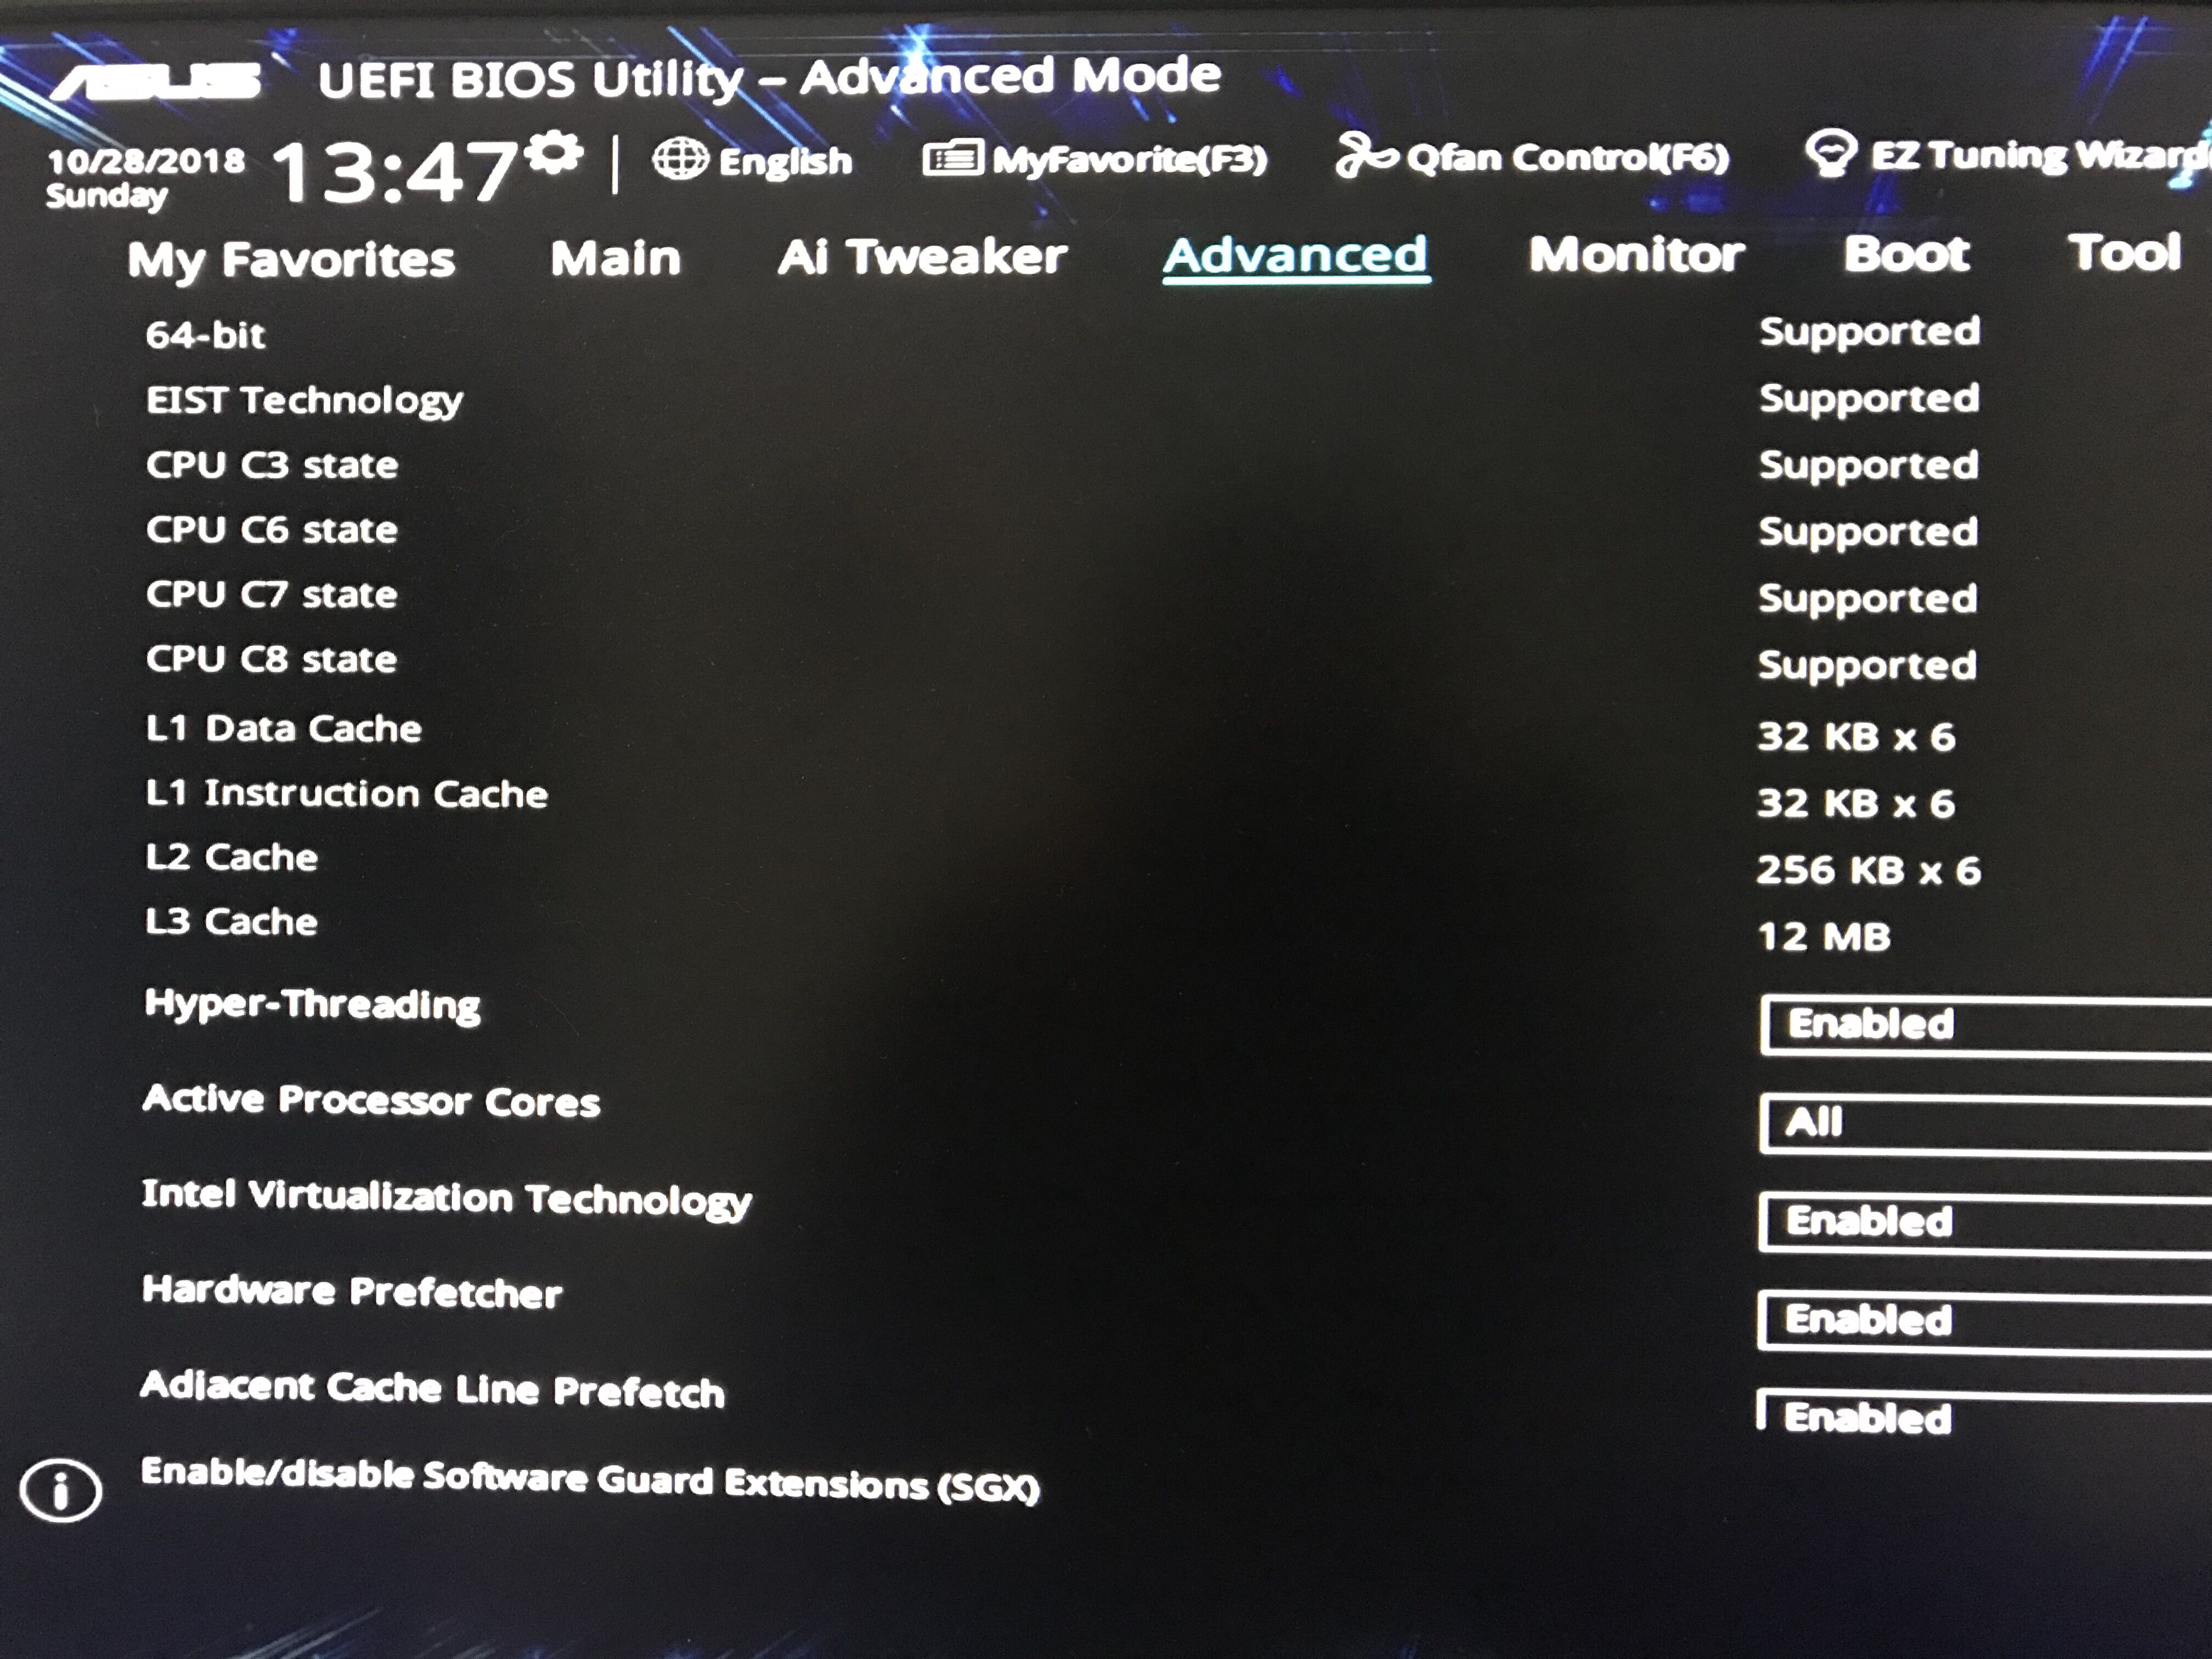
WARNING KVM acceleration not available, using ‘qemu’
这个问题的直观表现就是执行 virt-install 命令之后就卡住了,如下:
1 | [root@weilu_123 centos7-1]# virt-install \ |
这个问题是BIOS的CPU虚拟化功能没有开启导致的。
只要进入 BIOS,将Intel Virtualization Technology开启即可,下面例子是华硕主板:
参考
[1] RHEL and CentOS Kickstart on KVM Automated Installation With virt-install
[2] CentOS 7 INSTALLING IN TEXT MODE
[3] Use VNC mode to install CentOS 7
[4] Kickstart Installation